Migrating from VX520 to V400C Plus
If you are currently using a VX520 along with one of Forte’s solutions (Forte Checkout or Secure Web Pay) or using it with a custom application (Web, Desktop, or Native), you can migrate to the new V400C Plus, with a few simple and easy steps.
- Unbox the terminal.
-
Uninstall the VFI USB Driver 2.1.0.1_b2 or the older version of the Verifone Unified driver:
- Click the Windows icon in the lower left corner.
- Type in “Apps” to search for Apps and Features.
- Click on the Apps and Features item at the top of the pop-up window.
- If you have an entry for either VerifoneUnifiedDriver or VFI USB Driver, select it and then click the Uninstall button.
- Click the Uninstall button.
- Click the Yes button.
-
Which type of application are you using?
-
Forte Checkout and Secure Web Pay:
- Install the Verifone Windows Setup file.
-
Custom Web Applications:
- Install the Verifone Windows Setup file.
- Refer to your software provider for any additional instructions.
-
Desktop Applications:
- Install the Verifone Unified Driver
-
Native Applications:
- Install the Verifone Unified Driver
- Refer to your software provider for any additional instructions.
-
Forte Checkout and Secure Web Pay:
-
Check if the VerifoneUnifiedDriverInstaller is installed correctly:
- Click the Windows icon (“Start” button) in the lower left corner.
- Type in “Apps” to search for Apps and Features.
- Click on the Apps and Features item at the top of the pop-up window.
- Find the entry for VerifoneUnifiedDriverInstaller.
-
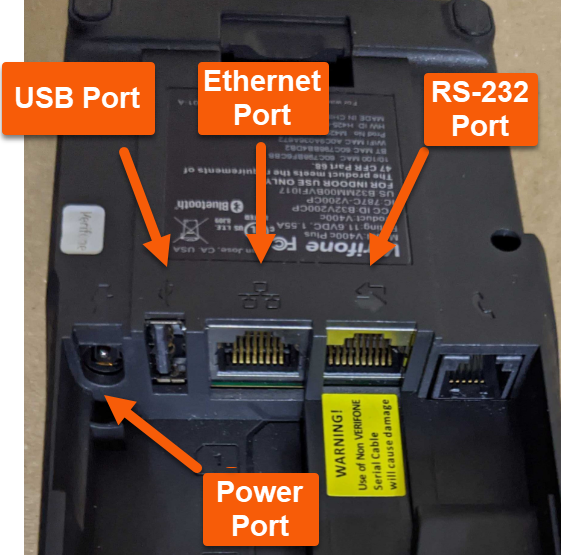
Attach the V400c to the host computer:
- Make sure your adapter is connected to miniUSB cable provided with your terminal.
- Attach the USB end of the cables to your host computer.
-
Attach the RS232 end (thick phone-like/ethernet connecter-like end) into the terminal next to the arrows.