![]()
Unboxing and Setting Up the V400C Plus P2PE Device
Secure Payments from Anywhere
Overview
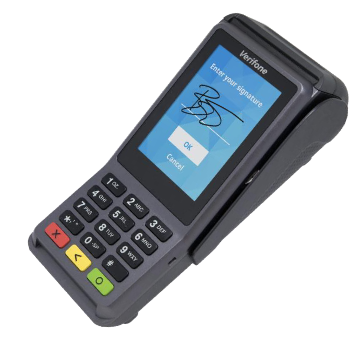
Congratulations on your purchase of the V400C Plus, a powerful, advanced countertop touchscreen device that combines the latest in features, functionality, and performance.
Checking the Packaging
Before you can start testing with the V400C Plus, complete the following steps to ensure the package is not damaged or previously opened.
- Immediately after receipt of your shipment, inspect the shipment box for major damage such as tears or holes, and visually ensure that the packaging has not been re-taped or resealed.
- Visually inspect the contents of the shipment box, which should contain the expected number of cardboard boxes that have an outer sticker indicating the serial number of each POI device.
- The POI device should be contained within a serialized tamper-evident bag or secured using serialized tamper-evident packaging or seals.
The POI device in its tamper-evident bag with a tamper-evident sticker.
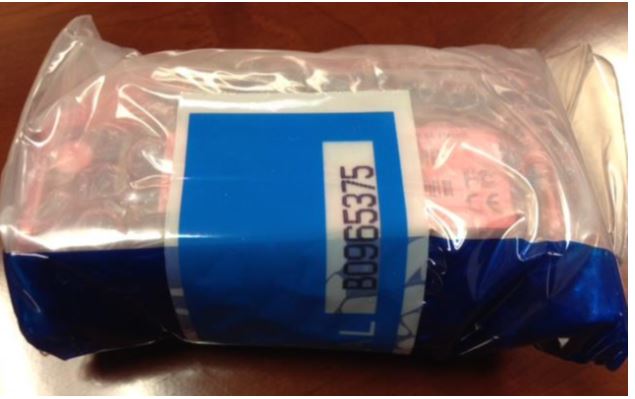
The box is sealed with security labels at every opening. This is how the box appears before the labels are removed.
.
- If you believe the device may have been tampered with during shipment or upon receipt, do not attempt to activate the device. Contact our Integration team at [email protected] or 866-290-5400 (select option 5 for the tech support queue, then option 4 for the equipment queue.)
NOTE: For more information, refer to Section 2.2 in the P2PE Instruction Manual.
Acknowledging the Device in P2PE Manager
After the packaging is checked, follow these steps to register the device in P2PE Manager.
- The employee listed as the contact for the location logs into P2PE Manager. This begins the process to confirm the device.
- The merchant employee manually keys or scans in the serial number for the device. The number is located on a sticker on the cardboard packaging of the box, and on a sticker located on the device.
- Open the cardboard box and verify the serial number from on the tamper-evident bag into P2PE Manager.
- If the serial numbers match the injection and shipment records registered by the KIF, the device is marked as being eligible to use. If the serial number of the device and the number on the bag do not match, the device is barred from use.
- To replace a device that you cannot use, contact the Integration team at [email protected] or 866-290-5400 (select option 5 for the tech support queue, then option 4 for the equipment queue.)
Activating the Device in P2PE Manager
After you acknowledge the shipping receipt in P2PE Manager, activate the device following these steps:
- Navigate to the P2PE Manager Device tab.
- Change the device status to Activating to activate the device.
- This makes the device functional, and you can start processing transactions. After you start processing cards, the device automatically changes from Activating to Active status.
- Run a test transaction and verify the transaction in P2PE Manager under the Transaction tab to verify the device works properly. If it is not, contact the Integration team at [email protected] or 866-290-5400 (select option 5 for the tech support queue, then option 4 for the equipment queue.)
NOTE: For more information on how to receive and activate a device in P2PE Manager, see the "Receiving and Activating Device" section in the Bluefin P2PE Manager Merchant documentation.
Selecting the Appropriate Location for Deployed Devices
All deployed devices must be securely mounted and easily visible by staff to prevent unauthorized removal or tampering. Place the device in an area where it is readily observed and monitored by authorized personnel and in an environment that deters attempts to compromise the device.
NOTE: For more information on how to select an appropriate location for deployed devices, refer to Section 4.2 in the P2PE Instruction Manual.
Installing and Connecting the Device
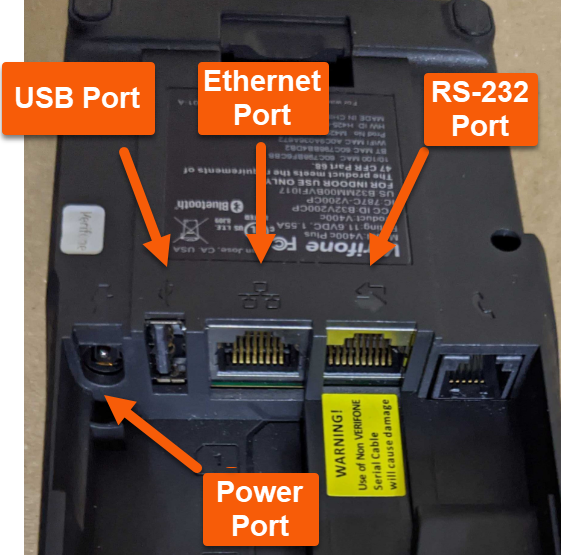
If your V400C Plus is used in a semi-hybrid mode, refer to Dev Docs to know how to set up your device depending on your mode of integration. In a semi-hybrid mode, you need the following adapter and cable to connect your V400C Plus to your computer.
- Adapter: RS-232 male-to-Mini-USB female adapter.
- Cable: Mini-USB-to-USB cable
You can buy the adapter and cable from Forte's Equipment page.
This image displays the ports for each cable and connector.
Before testing the V400C Plus, complete the following steps:
- Take the device out of the box and plug in the power cable.
- After the terminal boots up, it displays your Merchant Name.
- Connect to the Internet, using an Ethernet cable or through Wi-Fi. To see detailed steps, click on a connection type.
If you need to change the connection type that you initally configured, or for assistant setting up your Internet, contact the Integration team at [email protected] or 866-290-5400 (select option 5 for the tech support queue, then option 4 for the equipment queue.
Processing a Transaction
To process a transaction using your V400C Plus in standalone mode, follow these steps:
- Tap on the Home screen or press the green O key.
- Otional: Choose the location if multiple MIDs are configured on the terminal.
- Enter the amount. For example, to enter $1.56, enter 156.
- If additional details are captured, tap the box and enter the required details.
- Tap the Read Card button.
- Dip or swipe the card (swipe is allowed only for non-chipped cards.)
- Remove the card (chip only) when prompted on the terminal.
- Enter the Postal Code, then click the Next, button if the code is being captured.
- The Total screen appears.
- Click OK to complete the transaction.
- Optional: Tap the Print Customer Receipt button to print a receipt.
- Tap the Done button.
NOTE: Multiple presses of a key cycles through the letters on the key.
Searching a Transaction
The following steps show you how to search for a transaction in standalone mode using your V400C Plus:
- Tap the hamburger icon in the upper left corner.
- Optional: Select the location using the Location drop-down menu if multiple MIDs are configured on the terminal.
- Tap the Search Transactions button.
- Choose the criteria with which you want to find the transaction, such as Sequence #, $ Amount, or Last 4 of the Card #.
- Enter the value you want to search for using the keypad.
- Tap the Search button.
- Optional: Use the drop-down menu to select the transaction if there is more than one transaction based on the provided search criteria.
- The transaction details appear on the screen.
NOTE: Multiple presses of a key cycles through the letters on the key.
Voiding a Transaction
The following steps show you how to void a transaction in standalone mode on your V400C Plus:
- Tap the hamburger icon in the upper left corner.
- Optional: Select the location using the Location drop-down menu if multiple MIDs are configured on the terminal.
- Tap the Search Transactions button.
- Choose the criteria with which you want to find the transaction, such as Sequence #, $ Amount, or Last 4 of the Card #.
- Enter the value you want to search for using the keypad.
- Tap the Search button.
- Optional: Use the drop-down menu to select the transaction if there is more than one transaction based on the provided search criteria.
- Optional: Tap the Select button if there is more than one transaction based on the search criteria.
- Tap the Void button.
- The transaction is voided.
- Optional: Tap the Print Customer Receipt button to print a receipt.
NOTE: Multiple presses of a key cycles through the letters on the key.
Reprinting a Receipt
You can reprint a receipt in standalone mode on the V400C Plus using these steps:
- Tap the hamburger icon in the upper left corner.
- Optional: Select the location using the Location drop-down menu if multiple MIDs are configured on the terminal.
- Tap the Search Transactions button.
- Choose the criteria with which you want to find the transaction, such as Sequence #, $ Amount, or Last 4 of the Card #.
- Enter the value you want to search for using the keypad.
- Tap the Search button.
- Optional: Use the drop-down menu to select the transaction for which you want the receipt reprinted if there are multiple transactions based on the search criteria provided.
- Tap the Print Merchant Receipt button to reprint a merchant copy of the receipt or tap Print Customer Receipt to reprint a customer copy.
NOTE: Multiple presses of a key cycles through the letters on the key.
Reporting
You can reprint a receipt in standalone mode on the V400C Plus using these steps:
- Tap the hamburger icon in the upper left corner.
- Click the Reporting button.
- Tap the Print Merchant Receipt button to reprint a merchant copy of the receipt or tap Print Customer Receipt to reprint a customer copy.